
浅草 せんそじ (Sensoji Temple)

美しい Tokyo 夜空

Tokyo Tower

日本棋院
ここの多くの幼年期の思い出...
Lots of childhood memories here...


友達 黄翊祖 と 私

 图1
图1
 黑:马晓春 白:常昊 Nov 3, 2007 黑+1.5目
 黑:李映九 白:朴时烈 Aug 17, 2009 白+1.5目
 图3
图3 图4
图4 图5
图5
How should white respond if black pincers with 黑1?
 基本图
基本图 With clear picture from the surrounding, the decision between A and B is quite easy to make for black. From a rough analysis, if black presses from A to build thickness then black probabily tries to use it to build moyo in the left side. But the solid white corner effectively constrains black's moyo development.
 黑1 tight pincer is a logical move. Black tries to extend to the farthest to maximize black's thickness.
Sometimes face with vast empty board like above, decision becomes very murky and very difficult to pinpoint. In this case, we need to "probe" for more information.

白1 is the "probe" move. White is soliciting more information from black to make the picture clearer so white can make better decision at the lower corner. Black's response at either A or B will alter white's response at lower corner.

Question 1:
If black defends with 黑2 then how would white play at the lower corner?
 基本图
基本图

 黑1-黑5 is probabily 一本道 next white needs to prey the brain and think about how to fortify cuts outside.
 黑4 is too severe thus 白1 capture is not a good option.
 After 黑2 join, corner territory is quite big plus not much of aiji. Although white gains sente (original joseki white is gote) black peeks at A is a bit annoy.
  For original joseki, white has a nice yose move at 白1 when white has marked seed. 黑2 is 本手. White reduces black corner's territory by tightening black group's liberties.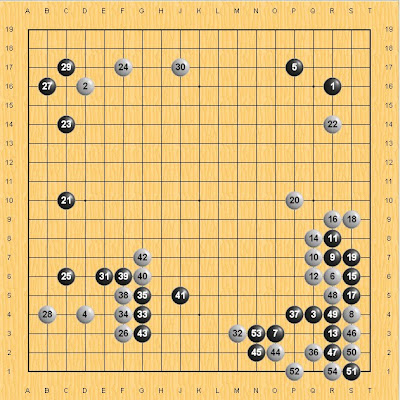
黑: 张亚博 白: 柁嘉熹 July 01, 2009 白+
黑37 is a bit of overplay. 白44-52 impressive sequence of tesuji moves.
 白1 is the easiest to think so but white group is a bit heavy especially after black peeks at A. Corner white seed can't pull out as white doesn't have enough liberties.
白1 is an interesting move. If black carelessly responds with 黑2 then 白3 capture becomes sente. White can be satisfied with this variation.
 Sequence up to 白5 is a possible variation. Personally I prefer black a bit more.

 黑4 扳 is the first instinct. But after 白7, 黑 needs to buckle down and do some serious calculation on whether black can cut on B or not.
 Black needs to consider whether to extend at A first or join directly at B. As a spoiler, extend at A does not work well for black.
 Due to ko material at A, white can win the ko fight in the corner. This variation is unsuccessful for black.
 黑1 join is correct. After 黑3, if white wants to continue to fight in the corner can play either A or B. Although calculation is rather tedious, both variations are not favorable for white.
 白15 = A
 白1 = A
 黑1 removes ko is overly fierce. Sequence to 黑9 we have a rare seki with white group without an eye.
 黑1 is correct. White group is unconditionally surroundered.
Key points:
1) White can't fight head on against black with either A or B. However, white can live in the corner with C.
2) Black doesn't have an immediate suitable ladder breaker for triangle black seed. D is not a ladder breaker.
3) White can actually defend against marked black seed from escaping with E.
Conclude: 基本图 option B variation is not favorable for black.
 Even if black can escape with 黑1, black group will transform into a spectacular art piece.

 Posts
All Comments
Posts
All Comments


