Friday, October 23, 2009
About my blog
As I will relinquish my teaching position with Singapore Weiqi Association in the near future, I wish I can continue to make contributions to Singapore weiqi society through regular updates on my blog. If you have questions about any of my blog entries please feel free to leave a comment on my blog or email me your questions directly at philliphsia@yahoo.com. Ciao! Have fun^^
定石 Research Part 3
 基本图
基本图黑1 cuts directly without atari (R15) gives black an option to capture marked white seed with A.


If 白2 长 to 白4 this variation looks somewhat like another variation (right).
Key differences: Left variation
1. Black has more territory. Although some bad aiji marked white seed can not live right away in the corner.
2. Exterior white group feels thinner and weaker.
Therefore, 白2 is probabily not a good option.
 黑1-黑5 is probabily 一本道 next white needs to prey the brain and think about how to fortify cuts outside.
 黑4 is too severe thus 白1 capture is not a good option.
 After 黑2 join, corner territory is quite big plus not much of aiji. Although white gains sente (original joseki white is gote) black peeks at A is a bit annoy.
  For original joseki, white has a nice yose move at 白1 when white has marked seed. 黑2 is 本手. White reduces black corner's territory by tightening black group's liberties.
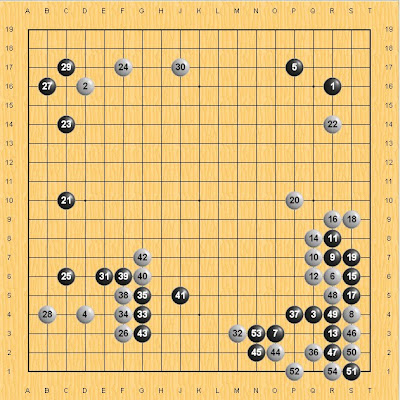
黑: 张亚博 白: 柁嘉熹 July 01, 2009 白+
黑37 is a bit of overplay. 白44-52 impressive sequence of tesuji moves.
 白1 is the easiest to think so but white group is a bit heavy especially after black peeks at A. Corner white seed can't pull out as white doesn't have enough liberties.
白1 is an interesting move. If black carelessly responds with 黑2 then 白3 capture becomes sente. White can be satisfied with this variation.
 Sequence up to 白5 is a possible variation. Personally I prefer black a bit more.
Wednesday, October 21, 2009
定石 Research Part 2

基本图
For this situation, 白3 is a rare experimental move. 黑 can rougly respond at A-C. On the last article, choice A is rejected because of bad corner aiji.
 黑4 扳 is the first instinct. But after 白7, 黑 needs to buckle down and do some serious calculation on whether black can cut on B or not.
 Black needs to consider whether to extend at A first or join directly at B. As a spoiler, extend at A does not work well for black.
 Due to ko material at A, white can win the ko fight in the corner. This variation is unsuccessful for black.
 黑1 join is correct. After 黑3, if white wants to continue to fight in the corner can play either A or B. Although calculation is rather tedious, both variations are not favorable for white.
 白15 = A
Due to ko material at B for black, white can not win the corner ko fight. Now we can see why extension at P11 is not good for black.
 白1 = A
Sequence up to 白11 is rather straight forward. 黑12 take is correct. Black should be careful with 白13.
 黑1 removes ko is overly fierce. Sequence to 黑9 we have a rare seki with white group without an eye.
黑1 removes ko is overly fierce. Sequence to 黑9 we have a rare seki with white group without an eye. 黑1 is correct. White group is unconditionally surroundered.
Key points:
1) White can't fight head on against black with either A or B. However, white can live in the corner with C.
2) Black doesn't have an immediate suitable ladder breaker for triangle black seed. D is not a ladder breaker.
3) White can actually defend against marked black seed from escaping with E.
Conclude: 基本图 option B variation is not favorable for black.
 Even if black can escape with 黑1, black group will transform into a spectacular art piece.
Subscribe to:
Posts (Atom)

